Creating a Custom Power Management Plan
Written by Allen Wyatt (last updated February 11, 2019)
Most modern computers allow Windows to control both the computer itself (including the hard drive) and the display monitor. These components can be set to automatically "turn off" after varying amounts of inactivity. If the pre-defined power management plans in Windows don't meet your needs, you can create your own custom plan. Follow these steps:
- Display the Control Panel.
- At the left side of the screen click the Hardware and Sound heading. Windows displays the Hardware and Sound screen.
- Under the category of Power Options, click the Change Power-Saving Settings option. Windows displays the Power Options screen. (See Figure 1.)

Figure 1. The Power Options screen.
- At the left side of the screen click Create a Power Plan. Windows displays the Create a Power Plan screen. (See Figure 2.)

Figure 2. The Create a Power Plan screen.
- Pick one of the existing power management plans (Balanced, Power Saver, or High Performance) as the starting point for your new power plan.
- Specify a name for your power plan.
- Click Next. Windows displays the Edit Plan Settings screen. (See Figure 3.)
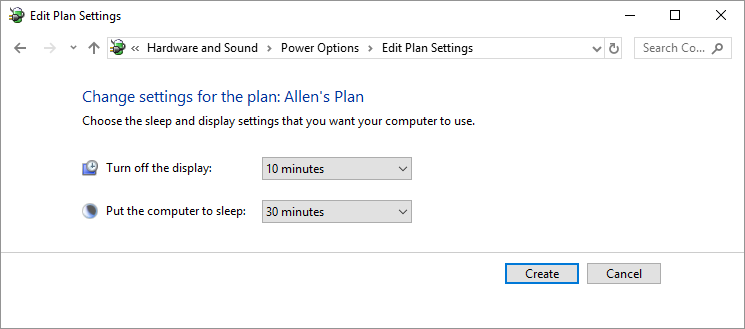
Figure 3. The Edit Plan Settings screen.
- Use the controls on the screen to specify when Windows should turn off the display and put the computer to sleep. (Remember that the times represent periods of activity, so 10 minutes means that the device is turned off when you stop using the computer for 10 minutes.)
- Click Create.
Author Bio
Allen Wyatt
With more than 50 non-fiction books and numerous magazine articles to his credit, Allen Wyatt is an internationally recognized author. He is president of Sharon Parq Associates, a computer and publishing services company. Learn more about Allen...
Creating Categories for Your Table of Authorities
A table of authorities is normally divided into separate sections based on categories you define. Here's how to create ...
Discover More
Macro Runs Slowly, but Steps Quickly
When you have a macro that processes a huge amount of data, it can seem like it takes forever to finish up. These ...
Discover More
Picking a Group of Cells
Excel makes it easy to select a group of contiguous cells. However, it also makes it easy to select non-contiguous groups ...
Discover More
Using Powercfg to List Your Existing Power Schemes
Windows allows you to define different power schemes that control how your computer uses power. This tip shows you how to ...
Discover More
Adjusting the Cursor Blink Rate
In Windows, the cursor indicates where you are about to type information using the keyboard. You can adjust how quickly ...
Discover More
Using Powercfg to Delete an Existing Power Scheme
You may have created a new power scheme for whatever reason, but when it has outlived its usefulness, you want to delete ...
Discover More
Comments